

Appearance
Quickstart
This walkthrough starts bundlemcp on your own machine, and then uses the admin UI to register an upstream MCP server, put it in a bundle, publish the bundle as an endpoint and call a tool through it. It takes about ten minutes.
Everything here runs locally, with development passwords and plain HTTP. That is the right setup for trying bundlemcp out, and the wrong one for other people to use: Local, tunnel or production explains the difference.
Prerequisites
- Docker Engine 24 or newer with the compose plugin.
- Ports 8000, 3000, 8080 and 9000 free on the host.
- About 4 GB of free RAM and 5 GB of disk. The first start builds a Python and a Nuxt image from source, which takes a few minutes.
Nothing else: the stack brings its own database, live-state store and identity provider.
1. Start the stack
Not public yet
bundlemcp's source code and container images are being prepared for public release. The commands on this page need them, so they work once the repository is public.
bash
git clone https://github.com/wingfold-ai/bundlemcp.git
cd bundlemcp
cp deploy/.env.example deploy/.env
docker compose -f deploy/docker-compose.yml --env-file deploy/.env up -d --build --wait --wait-timeout 300
The stack starts eight containers:
| Service | Port | Purpose |
|---|---|---|
gateway | 8000 | The bundlemcp gateway: MCP endpoints, OAuth server, management API |
web | 3000 | The admin UI |
postgres | internal | Durable configuration, tokens, audit log |
valkey | internal | Live sessions, rate limits, cross-replica signalling |
keycloak | 8080 | Development identity provider (admin / admin) |
echo-mcp | internal | A tiny example MCP server with three tools |
identity-demo | internal | An example MCP server that reports who the gateway says is calling |
oauth-demo | 9000 | An example MCP server that requires its own OAuth sign-in (demo_user / demo_password) |
--wait returns once the gateway reports ready. A timeout on the first run usually means the images are still being built, not that anything failed.
Not empty on first boot
The stack loads deploy/seed.yaml as a bootstrap file. It registers the two example upstream servers, puts them in a demo bundle, and publishes that bundle as three endpoints: demo for API keys, and claude and chatgpt for those clients, with the oauth_only and write_as_read profiles. A separate identity endpoint serves the identity demo, which shows what an upstream server learns about you (Upstream identity).
2. Sign in to the admin UI
Open http://localhost:3000. You are sent to the development identity provider; sign in with admin / admin.
That account's email is listed in BUNDLEMCP_ADMIN_EMAILS, so it gets admin rights and lands on the Upstream servers page. Any other account sees the catalogue instead: the bundles it can connect an MCP client to, and nothing to manage.
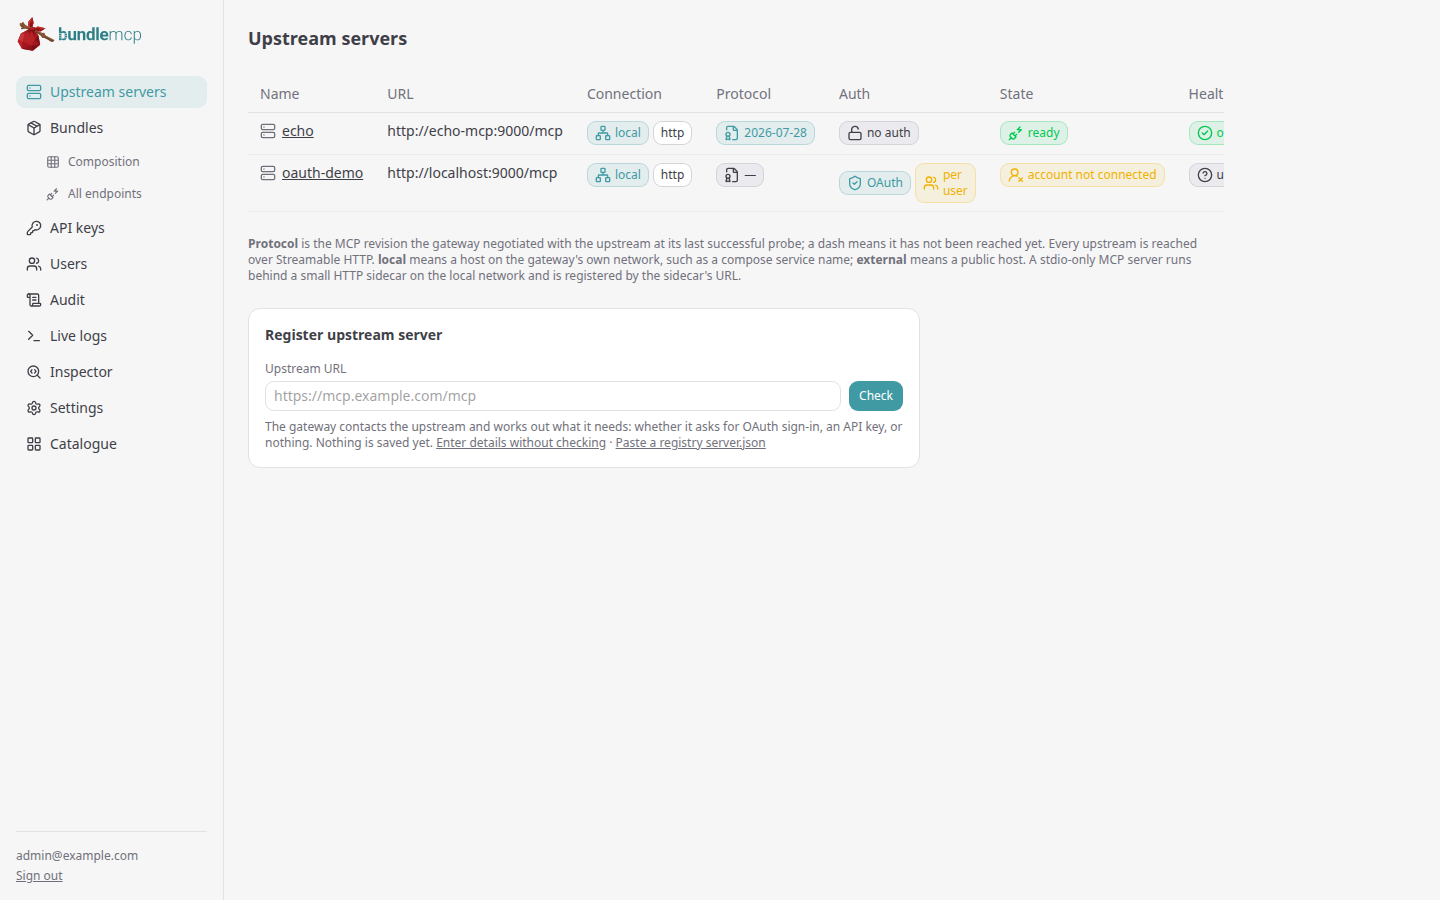
echo is ready. oauth-demo says account not connected: it only answers to someone who has signed in to it, which happens later, from an MCP client.
3. Register an upstream server
An upstream server (or upstream for short) is an MCP server that bundlemcp forwards tool calls to. To have one that is guaranteed to be running, register the example echo-mcp server a second time, under a new name. To use your own server instead, enter its URL — see the warning below first.
- On the Upstream servers page, enter
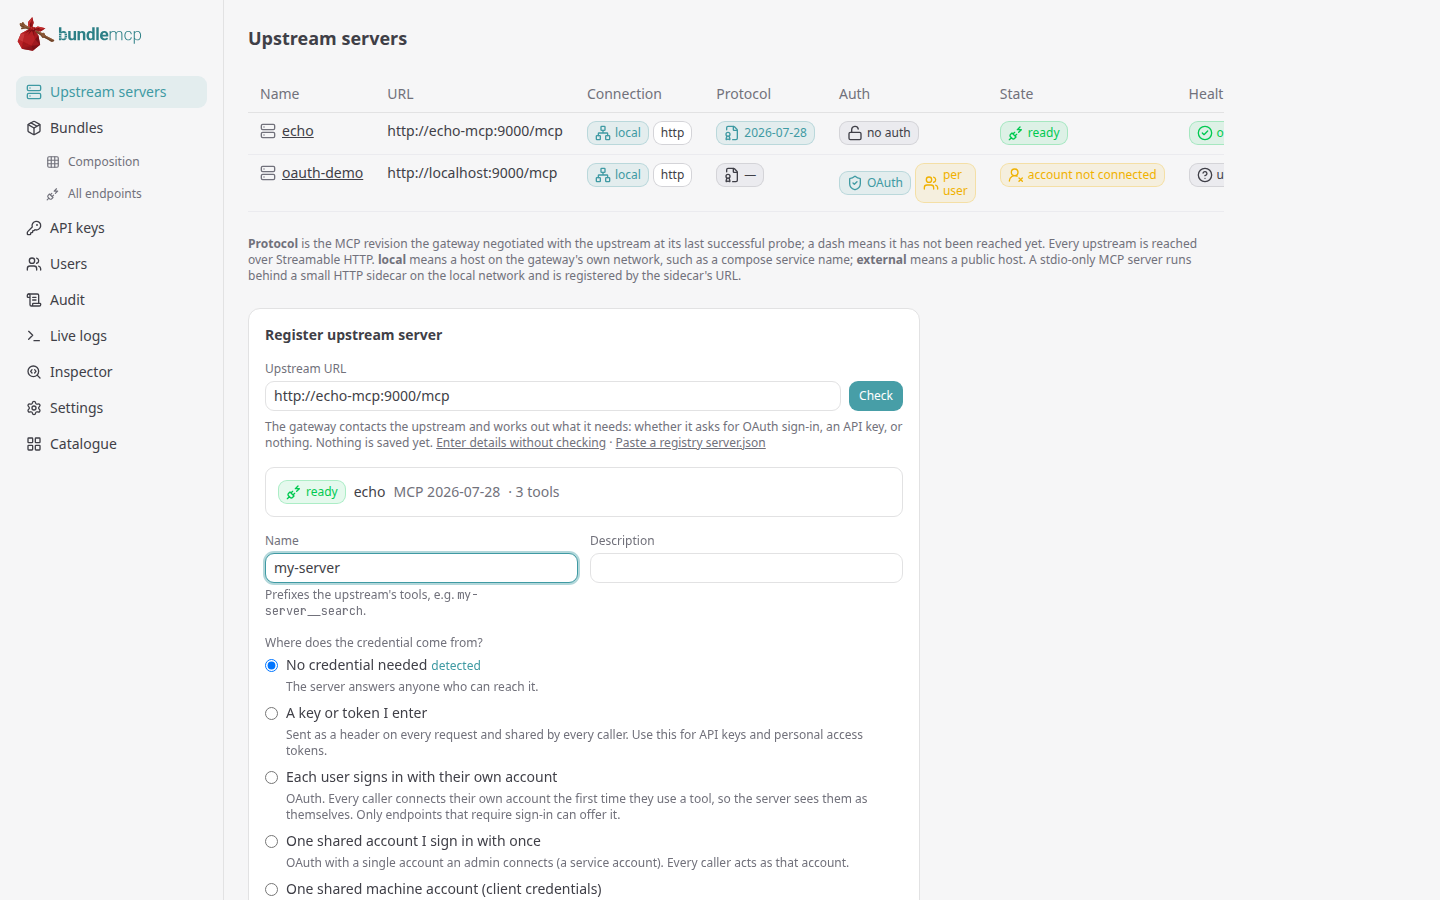
http://echo-mcp:9000/mcpunder Register upstream server and click Check. The gateway contacts the server and reports what it found: here ready, the MCP revision it speaks and three tools, and that it needs no credential. - Enter
my-serveras the Name. The name becomes the prefix of every tool the server contributes, such asmy-server__echo. - Click Register.
The server's page opens. Its Tools table shows what the gateway discovered; Refresh tools asks the server again.
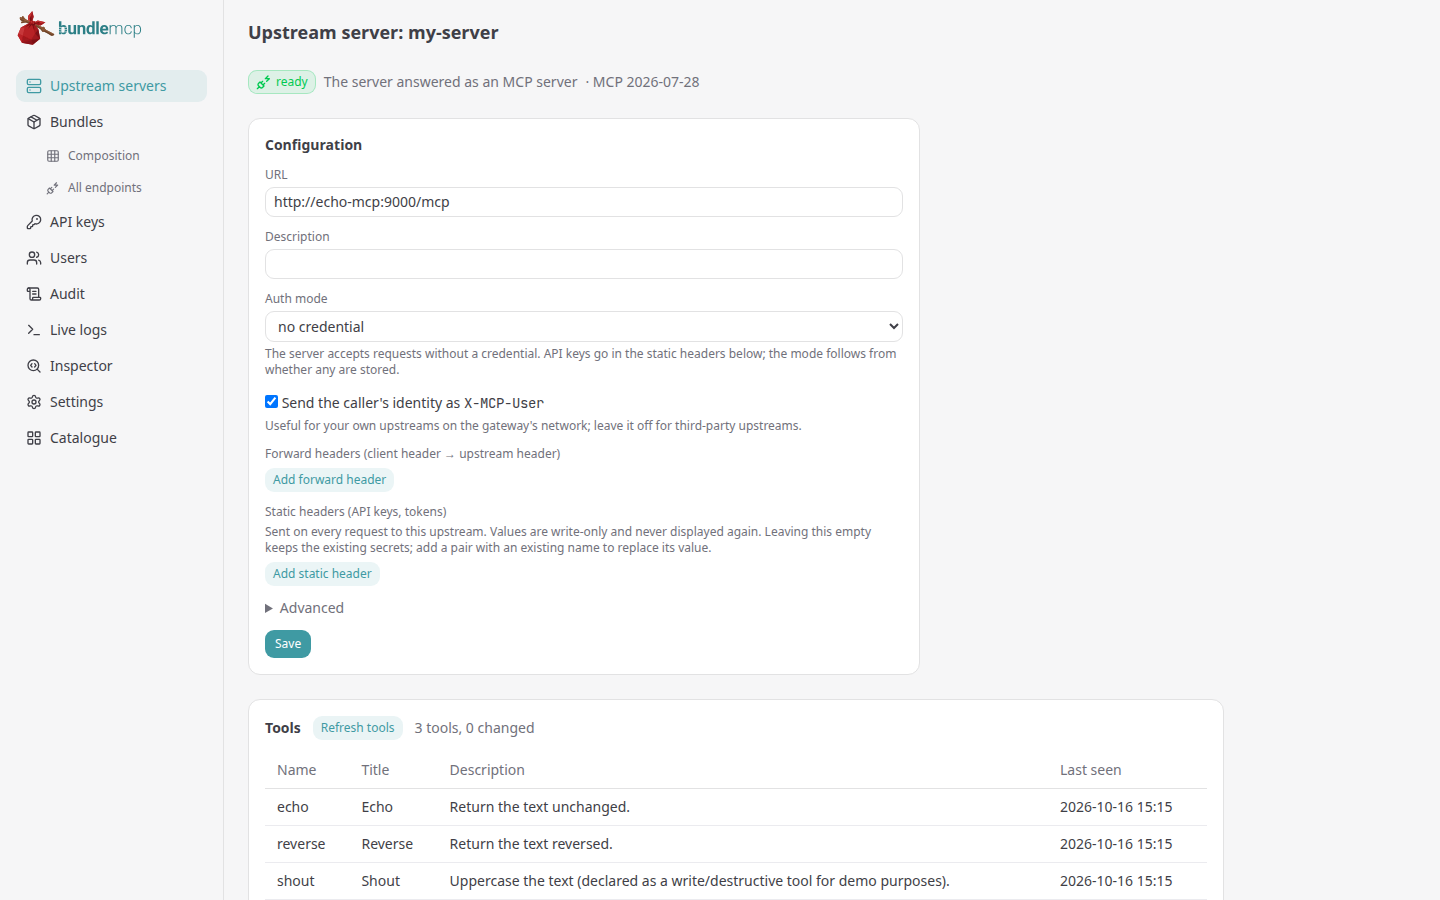
The other settings on this page — headers, identity, auth mode — are explained in Upstream server settings. The echo server needs none of them.
The gateway dials this URL from inside its container
Two consequences, and between them they account for most first-time failures:
localhostis not your machine. Inside the container it is the container. Worse, the gateway's egress policy blocks loopback outright, so ahttp://localhost:9000/mcpURL is refused rather than merely unreachable.- Reach your host by name. Use
http://host.docker.internal:9000/mcp. On Linux, addextra_hosts: ["host.docker.internal:host-gateway"]to thegatewayservice first. Alternatively attach your server to the compose network and use its service name, asecho-mcpdoes.
See Network egress for the policy and how to widen it.
The same step through the management API
bash
KEY=bmcp_sk_devservicekey000000000000000000000000
curl -s -X PUT http://localhost:8000/api/v1/upstreams/my-server \
  -H "Authorization: Bearer $KEY" -H "Content-Type: application/json" \
  -d '{"name":"my-server","url":"http://echo-mcp:9000/mcp"}'
KEY is the development service key the compose file provisions. The gateway discovers the tools in the background; POST /api/v1/upstreams/my-server:refresh-tools does it immediately.
4. Put it in a bundle
A bundle combines the tools of several upstream servers into what looks, to a client, like one MCP server.
- Open Bundles, enter
toolsas the name and My tools and the echo tools as the description, and create it. - Open the new bundle. Under Upstream servers, select
my-serverand click Add member; do the same forecho.
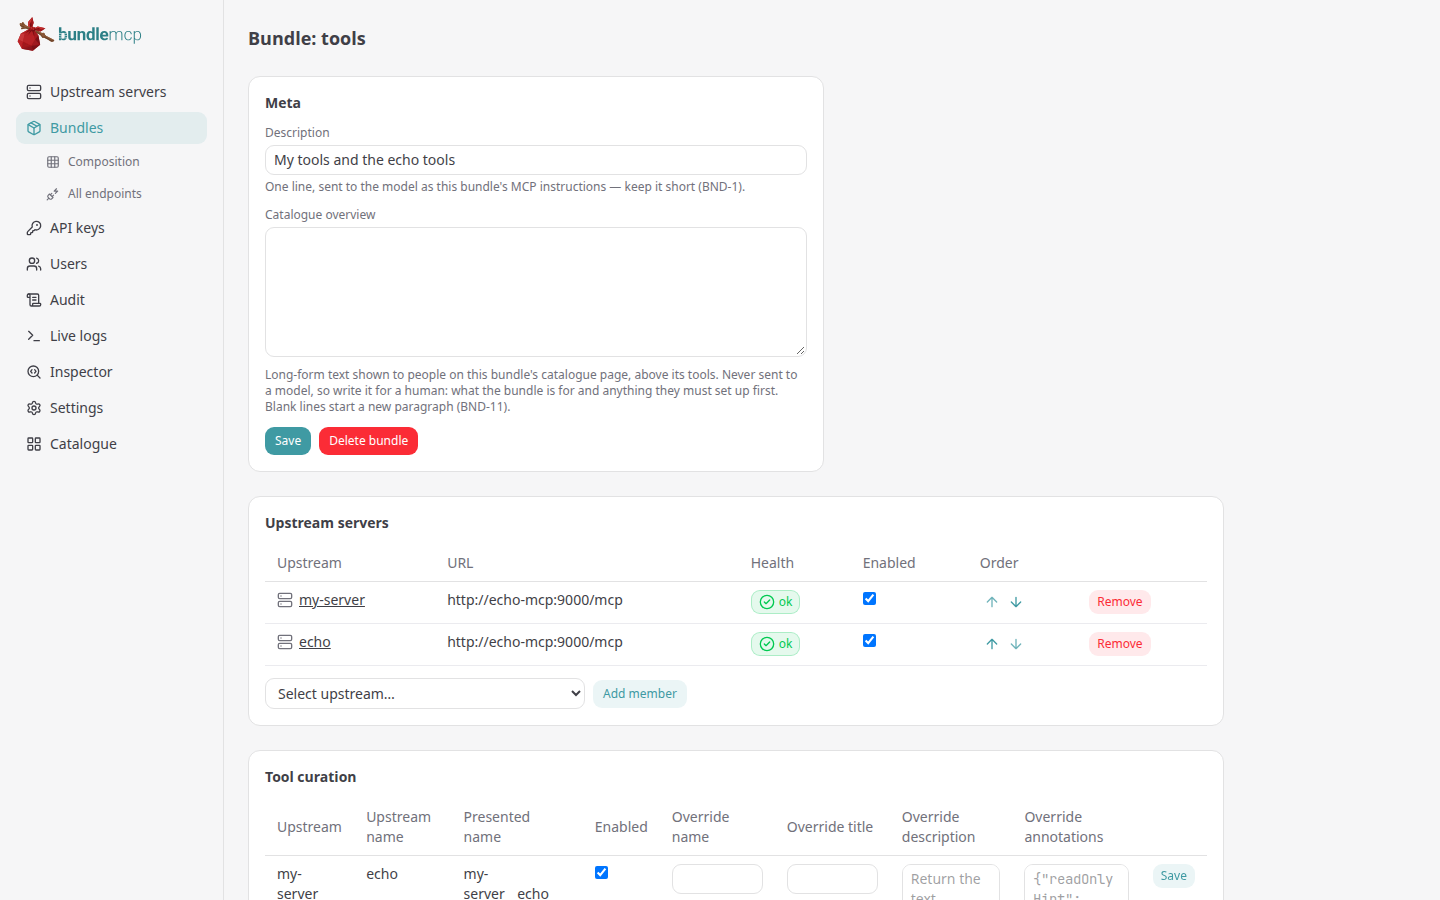
Further down, Tool curation lists all six tools as the client will see them, echo__reverse next to my-server__reverse. That is also where you would hide a tool or rename it for this bundle.
The same step through the management API
bash
API=http://localhost:8000/api/v1
curl -s -X PUT $API/bundles/tools -H "Authorization: Bearer $KEY" -H "Content-Type: application/json" \
  -d '{"name":"tools","description":"My tools and the echo tools"}'
curl -s -X PUT $API/bundles/tools/upstreams/my-server -H "Authorization: Bearer $KEY" \
  -H "Content-Type: application/json" -d '{"enabled":true}'
curl -s -X PUT $API/bundles/tools/upstreams/echo -H "Authorization: Bearer $KEY" \
  -H "Content-Type: application/json" -d '{"enabled":true}'
5. Publish it as an endpoint
A bundle is not reachable until it has an endpoint: a URL, plus the rules for who may use it and how. One bundle can have several endpoints, for example one that claude.ai signs in to and one that a script uses with an API key.
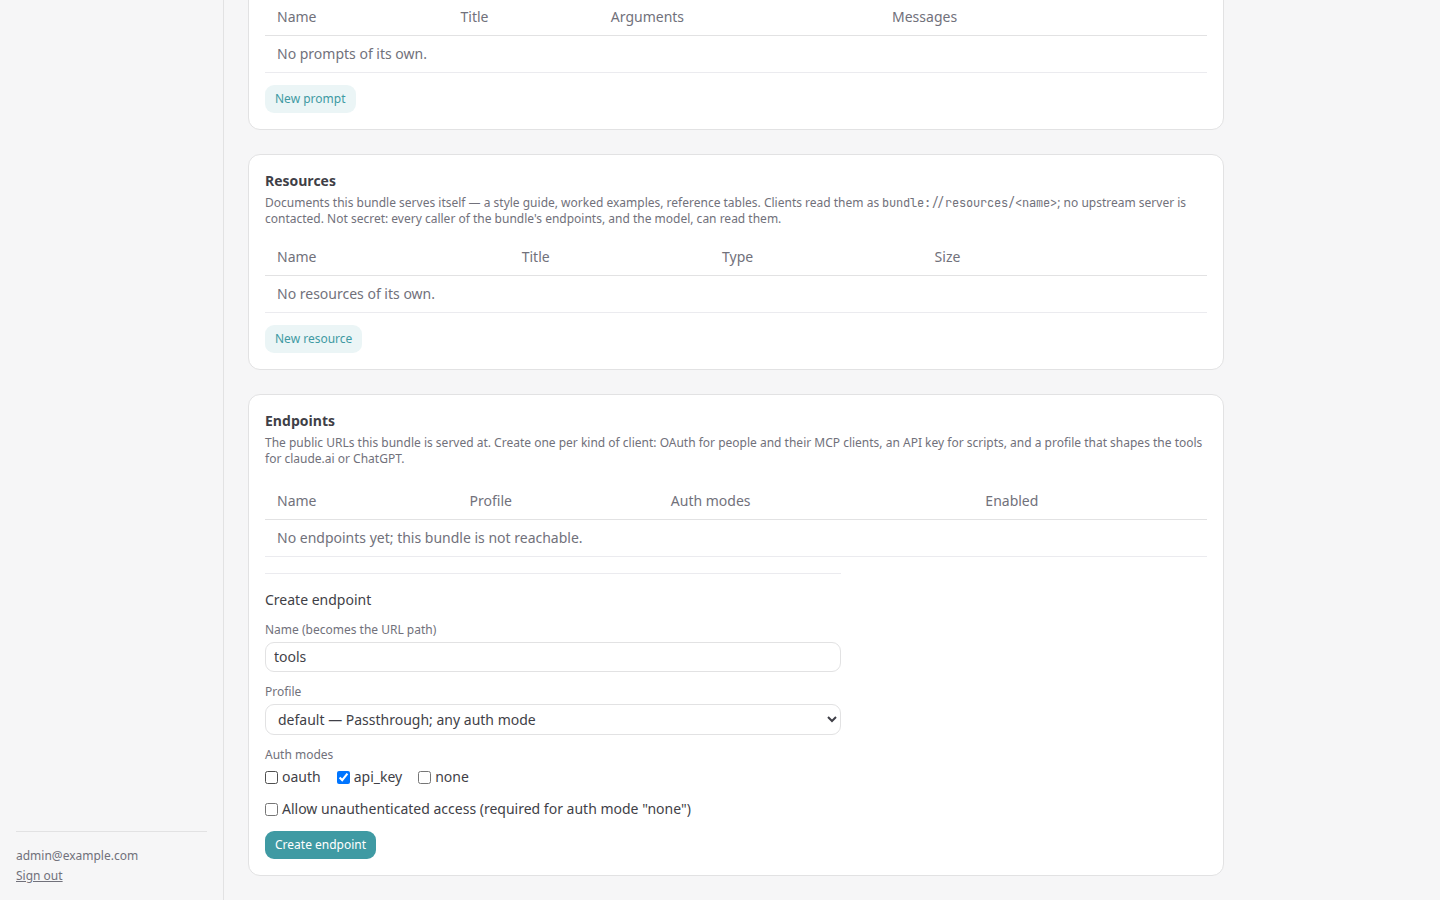
- On the bundle's page, under Endpoints → Create endpoint, enter
toolsas the name. - Keep the profile
default. Under Auth modes, checkapi_keyand uncheckoauth, so the endpoint takes API keys only. - Click Create endpoint.
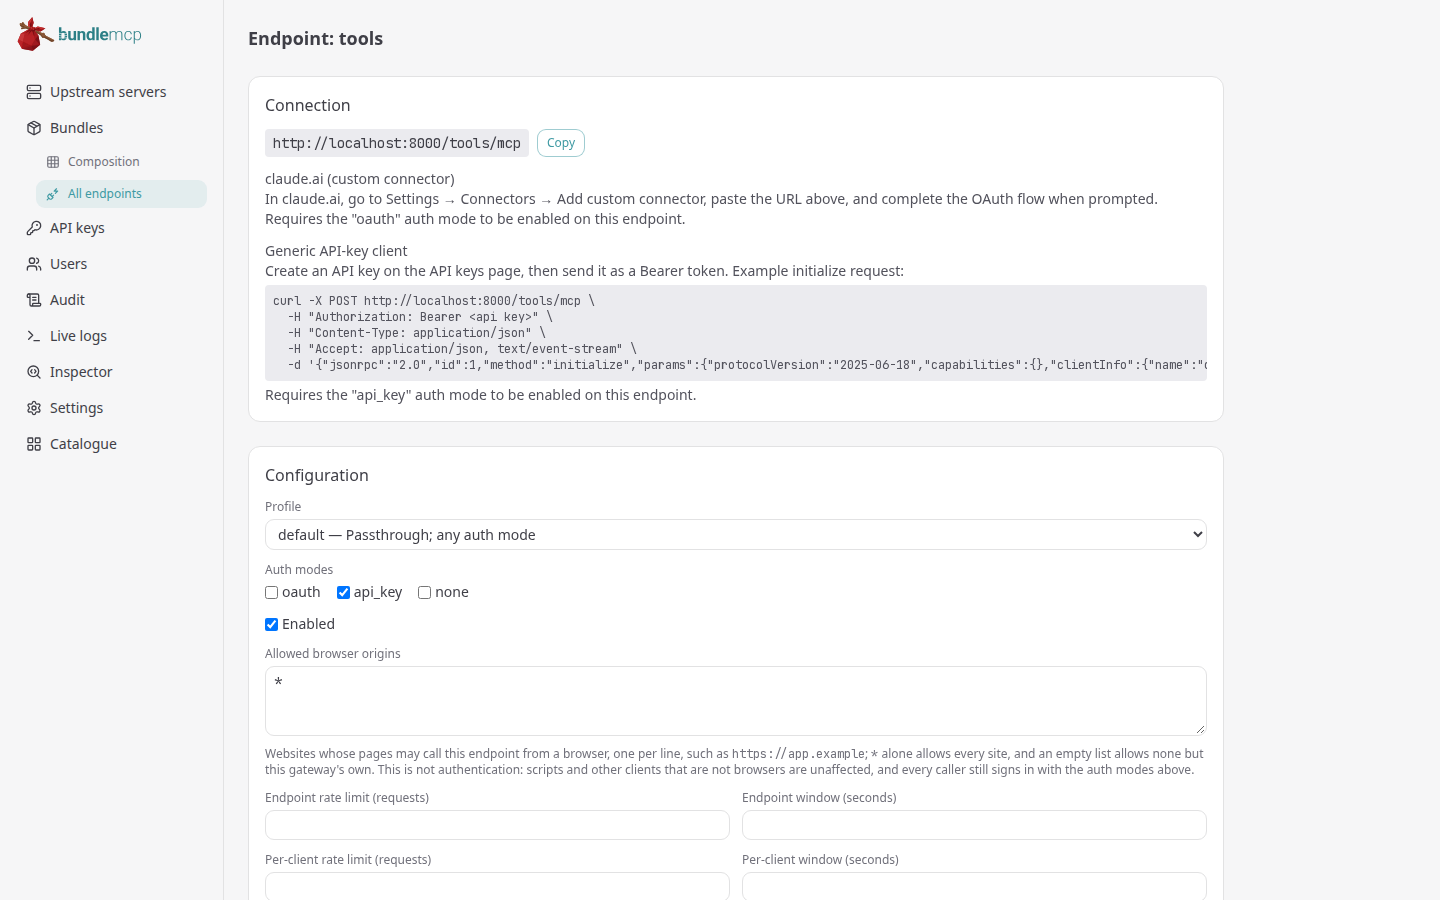
The endpoint's page shows the URL to give a client, setup instructions per kind of client, and its rate limits, which are empty, meaning unlimited.
The same step through the management API
bash
curl -s -X PUT $API/endpoints/tools -H "Authorization: Bearer $KEY" -H "Content-Type: application/json" \
  -d '{"name":"tools","bundle_name":"tools","profile":"default","auth_modes":["api_key"]}'
6. Create an API key
The endpoint takes API keys, so a client needs one.
- Open API keys, enter
my-scriptas the Name and keep the kindendpoint. An endpoint key can call MCP endpoints and nothing else; aservicekey could also manage the gateway. - Click Create.
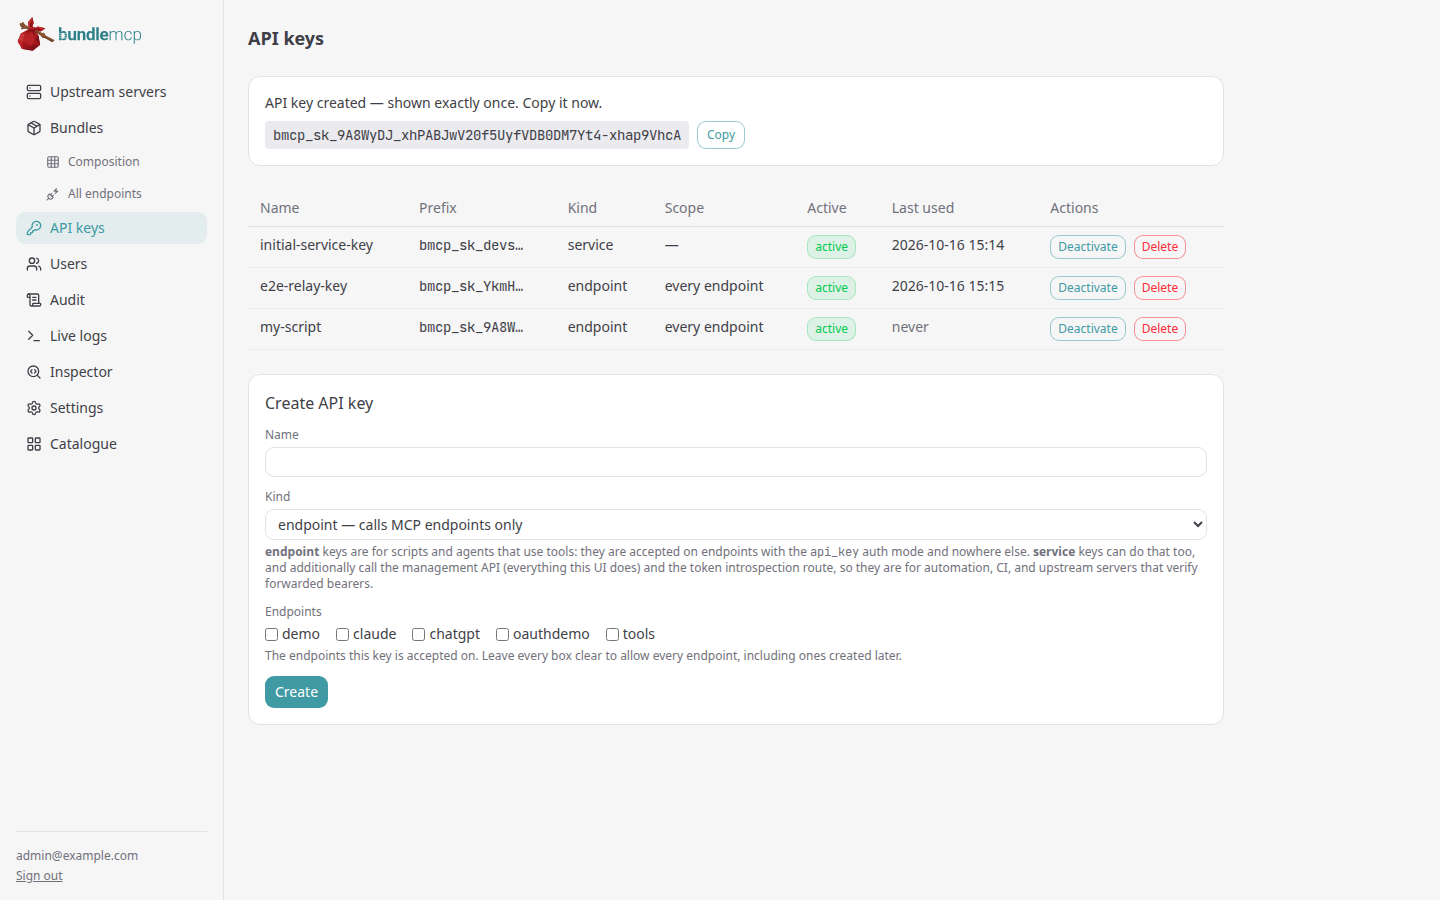
The key is shown exactly once. Copy it now: the gateway stores only a hash, so a lost key cannot be recovered, only replaced. The table keeps its prefix, so you can tell keys apart, and Deactivate or Delete revokes one.
The same step through the management API
bash
curl -s -X POST $API/api-keys -H "Authorization: Bearer $KEY" -H "Content-Type: application/json" \
  -d '{"name":"my-script","kind":"endpoint"}'
The reply carries the secret in key, again only this once.
7. Call a tool
Any MCP client can now use http://localhost:8000/tools/mcp with that key: Scripts and agents shows how to configure one. To see the gateway answer without installing a client, call it with curl.
List the tools and call one with curl
Set KEY to the key you just copied:
bash
KEY=bmcp_sk_...   # the key from step 6
V=2026-07-28

curl -s http://localhost:8000/tools/mcp \
  -H "Authorization: Bearer $KEY" -H "Content-Type: application/json" \
  -H "MCP-Protocol-Version: $V" -H "Mcp-Method: tools/list" \
  -d '{"jsonrpc":"2.0","id":1,"method":"tools/list","params":{"_meta":{
        "io.modelcontextprotocol/protocolVersion":"'"$V"'",
        "io.modelcontextprotocol/clientCapabilities":{}}}}'
The reply lists six tools. Call one — a tools/call also names the tool in the Mcp-Name header, and answers with a stream of events rather than a single JSON body:
bash
curl -s -N http://localhost:8000/tools/mcp \
  -H "Authorization: Bearer $KEY" -H "Content-Type: application/json" \
  -H "MCP-Protocol-Version: $V" -H "Mcp-Method: tools/call" \
  -H "Mcp-Name: my-server__reverse" \
  -d '{"jsonrpc":"2.0","id":2,"method":"tools/call","params":{
        "name":"my-server__reverse","arguments":{"text":"bundlemcp"},
        "_meta":{"io.modelcontextprotocol/protocolVersion":"'"$V"'",
                 "io.modelcontextprotocol/clientCapabilities":{}}}}'
The last data: event carries the result, pcmeldnub. The gateway saw the my-server__ prefix and forwarded the call to that upstream server.
Every call is recorded on the Audit page, and the key's Last used column on API keys updates.
Why all that ceremony in a plain POST?
The gateway serves two generations of the MCP protocol on one URL, and each request has to say which one it belongs to. A request in the current, stateless generation (revision 2026-07-28) repeats its protocol version and client capabilities in params._meta and mirrors three values into headers, so no session is needed. A client of the older generation instead opens with initialize and gets an Mcp-Session-Id to send from then on.
A POST carrying neither is refused with 400. Every MCP SDK builds one or the other for you — the ceremony is only visible when you use curl. The full contract is in Request envelope.
8. Connect claude.ai or ChatGPT
Scripts and agents work against this local stack as it is. claude.ai and ChatGPT do not: they connect from their own servers on the internet, which cannot reach localhost. They need your gateway at a public HTTPS address.
For a test, the quickest way there is a tunnel, which gives your local stack a temporary public URL. Start the stack again through deploy/stack.sh, which adds a Cloudflare tunnel and tells the gateway its new address:
bash
docker compose -f deploy/docker-compose.yml --env-file deploy/.env down
deploy/stack.sh rebuild
deploy/stack.sh first generates a service key, a token encryption key and the identity provider's admin password into deploy/.env and prints the service key: from now on, use that key instead of bmcp_sk_devservicekey…. rebuild starts from empty volumes, because the database of the stack you just ran still holds the published development key, and the script refuses to open a tunnel while the gateway accepts it. To keep your data instead, revoke that key under API keys in the admin UI and run deploy/stack.sh up.
It prints the URL to paste into each client, for example https://<random-words>.trycloudflare.com/claude/mcp. Then follow Connect claude.ai or Connect ChatGPT. The seeded claude and chatgpt endpoints are set up for them: OAuth sign-in, and the profile recommended for each client.
A tunnel publishes a development stack
Everyone who learns the tunnel URL reaches your development gateway. Its keys are generated, but its identity provider and demo upstreams use development logins, its realm accepts any redirect URI, and it speaks plain HTTP behind the tunnel. Keep it up only while you test. Local, tunnel or production explains what a real deployment changes and lists every setting it needs.
Tear down
bash
docker compose -f deploy/docker-compose.yml --env-file deploy/.env down   # or: deploy/stack.sh down
# add -v to also delete the database
Next steps
- Core concepts — upstream servers, bundles, endpoints and profiles, and why each exists.
- Local, tunnel or production — the settings a real deployment needs.
- Troubleshooting — if a step above did not behave as described.